
 I do a lot of property/architecture photography so the two things that have to be right are verticals and horizontals.
By far the easiest way to get these right is in the camera when you’re taking the shot. Saves an awful lot of messing about later!
A good tall tripod with spirit levels is your best friend if you’re going to be doing this type of photography.
Sometimes though it’s not possible to get the right angle, maybe you’re too near, or you just can’t get the right viewpoint. Never fear, Photoshop’s Transform tool can get you out of all sorts of trouble – here’s how.
I work as much as possible with keyboard shortcuts so I will use these here where possible. If you’re using Photoshop a lot then I would strongly recommend learning these shortcuts for most of the common functions, it makes life so much easier. The menu bar method is in brackets for those who like working the hard way! ;o)
4 Steps to Vertical Heaven
1. Open up your image and show the grid by selecting Ctrl+’ (View>Show>Grid).
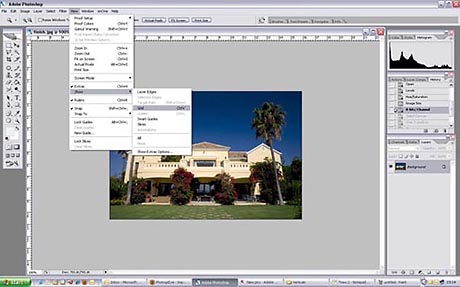
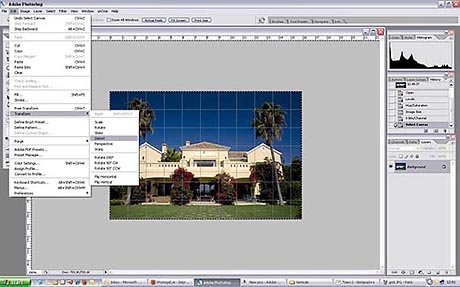
2. Next select all of the image with Ctrl+A (Select>All). Once you’ve selected it you can now go to Edit>Transform>Distort (no shortcut) which brings up the transform box.
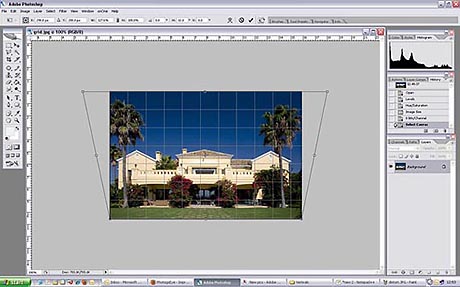
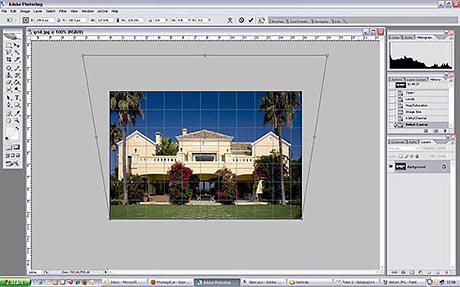
3. Now you just grab the relevant corners and drag them out until your verticals are straight and lined up with the grid. You can do the same with your horizontals as well if necessary.
4. Once you’ve done that you may well have a bit of a ‘squashed’ look to the image, so just take the top centre grab point and drag it upwards until it looks about right.
When you’re happy with how it looks hit ‘Enter’ and that gets rid of the transform box and locks in your adjustments. Don’t forget to deselect by hitting Ctrl+D (Select>Deselect).
Now get rid of the grid by hitting Ctrl+’ again (View>Show>Grid) (uncheck it) and you’ve got your finished image. All it needs now is a bit of curves/sharpening to finish off and you’re good to go.
Be careful with objects in the corners as these may become a bit distorted. If so you may want to crop the image slightly to lessen this effect.
Also bear in mind that an image ‘distorted’ like this is never going to match one that’s captured correctly in the first place, so whenever possible get your verticals straight in your viewfinder before you press that shutter.
You can see the before and after images below. Not bad for 5 minutes work!